> ## Documentation Index
> Fetch the complete documentation index at: https://docs.cudocompute.com/llms.txt
> Use this file to discover all available pages before exploring further.
# Video editing with Davinci Resolve
> Learn how to use Davinci resolve, video editing and color correction software, with CUDO Compute.
DaVinci Resolve collaboration tools allow multiple users to work on the same project simultaneously, enabling real-time
collaboration and communication. It provides features such as shared projects, project locking, and chat capabilities, making it easier for teams to collaborate and streamline their workflow.
## Quick start guide
1. Prerequisites
2. Setting up a Davinci resolve project server on Windows
3. Setting up a GPU rendering node
## Prerequisites
* Create a project and [add an SSH key](/docs/tutorials/how-to-generate-ssh-keys)
## Setting up a Davinci resolve project server
For the project server we will use a low-cost CPU only instance as it only needs to host a database.
* Choose a CPU only virtual machine and Configure
* Use the **Windows 10 Pro** image
Be sure to set a secure password for your Windows virtual machine.
Connect to your instance via Windows Remote Desktop. Use the public IP address of the virtual machine as the remote desktop computer name.
It may try and login with your local windows account if this is the case select 'more choices' -> 'Use a different account'
and type 'admin' as the username.
### Installing project server
Open a web browser on the virtual machine and go to [https://www.blackmagicdesign.com/support/](https://www.blackmagicdesign.com/support/) and download the latest version of Davinci project server.
Next install project server.
You will be prompted to create a server
* Enter the server name
* Create an admin user
* Set a secure password
Next create a project library. A project library can be used to hold multiple projects that share resources, i.e. a film and a trailer.
Open Project server and click 'File -> Enable Network Connections'
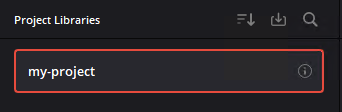
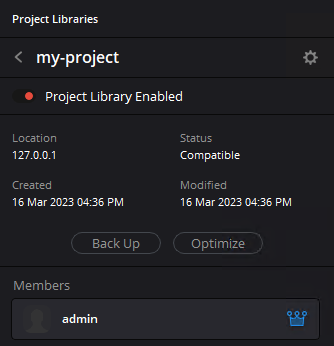
Click the 'i' on your project and enable the project library
 ### Allowing remote database access
Open notepad using 'Run as administrator' change the file type to open to 'All files'
Navigate to C:\Program Files\PostgreSQL\13\data and open pg\_hba.conf
pg\_hba.conf is a file used by PostgreSQL to determine who is allowed to connect to the database server and how they can
authenticate themselves, based on their location, username, and preferred authentication method.
You should see something like below.
```
# pg_hba.conf file has been edited by DaVinci Project Server. Hence, it is recommended to not edit this file manually.
# TYPE DATABASE USER ADDRESS METHOD
host all all 127.0.0.1/32 scram-sha-256
host all all ::1/128 scram-sha-256
host my-project all XX.XX.XX.XX/27 scram-sha-256
```
To the bottom of this file add this line:
```
host all all 0.0.0.0/0 scram-sha-256
```
This will allow any ip address to connect to any of your project libraries.
For security purposes it would be best to limit which ip addresses can attempt to connect to your project libraries.
### Allowing incoming connections
* Open Windows defender firewall and click on 'advanced settings' on the left hand panel.
* Go to 'Inbound rules' -> 'New Rule'
* For rule type select 'Port'
* Select 'Specific local ports' and enter 5432
* Select 'Allow the connection'
* Enter a name for your rule
### Test Connection
Open your local copy of Davinci resolve.
* On the home screen got to the 'Network tab'
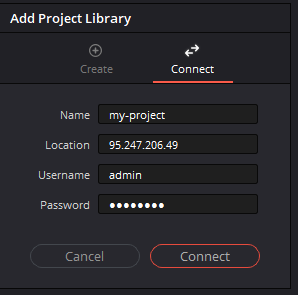
* Click 'Add Project Library'
* Be sure to select the 'Connect' tab in the pop-up
* Enter the library name, server ip address, username and password
### Allowing remote database access
Open notepad using 'Run as administrator' change the file type to open to 'All files'
Navigate to C:\Program Files\PostgreSQL\13\data and open pg\_hba.conf
pg\_hba.conf is a file used by PostgreSQL to determine who is allowed to connect to the database server and how they can
authenticate themselves, based on their location, username, and preferred authentication method.
You should see something like below.
```
# pg_hba.conf file has been edited by DaVinci Project Server. Hence, it is recommended to not edit this file manually.
# TYPE DATABASE USER ADDRESS METHOD
host all all 127.0.0.1/32 scram-sha-256
host all all ::1/128 scram-sha-256
host my-project all XX.XX.XX.XX/27 scram-sha-256
```
To the bottom of this file add this line:
```
host all all 0.0.0.0/0 scram-sha-256
```
This will allow any ip address to connect to any of your project libraries.
For security purposes it would be best to limit which ip addresses can attempt to connect to your project libraries.
### Allowing incoming connections
* Open Windows defender firewall and click on 'advanced settings' on the left hand panel.
* Go to 'Inbound rules' -> 'New Rule'
* For rule type select 'Port'
* Select 'Specific local ports' and enter 5432
* Select 'Allow the connection'
* Enter a name for your rule
### Test Connection
Open your local copy of Davinci resolve.
* On the home screen got to the 'Network tab'
* Click 'Add Project Library'
* Be sure to select the 'Connect' tab in the pop-up
* Enter the library name, server ip address, username and password
 If you want to collaborate with other users at the same time it would be better to set your project to multiple user collaboration.
* 'File' -> 'Multiple User Collaboration'
## Setting up a GPU rendering node
DaVinci Resolve uses GPUs to accelerate various tasks such as real-time playback, color grading, and rendering.
The software supports both NVIDIA GPUs and can utilize multiple GPUs simultaneously. DaVinci Resolve (free) allows for
a single GPU to be used, however the paid studio version can utilize multiple GPUs.
### Start a virtual machine
* Choose an NVIDIA GPU virtual machine and Configure
* Use the **Windows 10 Pro** image=
Be sure to set a secure password for your Windows virtual machine.
Connect to your instance via Windows Remote Desktop. Use the public IP address of the virtual machine as the remote desktop computer name.
It may try and login with your local windows account if this is the case select 'more choices' -> 'Use a different account'
and type 'admin' as the username.
### Install NVIDIA Drivers
Open a web browser on the virtual machine and go to [www.nvidia.com/download](http://www.nvidia.com/download) download the drivers you require,
if you are using an A4000/A5000/A6000 GPU be sure to download the RTX drivers.
Install the drivers.
### Install davinci resolve
Go to [www.blackmagicdesign.com/support](http://www.blackmagicdesign.com/support) and download the latest version of Davinci Resolve to the GPU virtual machine and install it.
### Connect to your project server
* Open Davinci resolve on your GPU instance
* On the home screen got to the 'Network tab'
* Click 'Add Project Library'
* Be sure to select the 'Connect' tab in the pop-up
* Enter the library name, server ip address, username and password
If you want to collaborate with other users at the same time it would be better to set your project to multiple user collaboration.
* 'File' -> 'Multiple User Collaboration'
If you want to collaborate with other users at the same time it would be better to set your project to multiple user collaboration.
* 'File' -> 'Multiple User Collaboration'
## Setting up a GPU rendering node
DaVinci Resolve uses GPUs to accelerate various tasks such as real-time playback, color grading, and rendering.
The software supports both NVIDIA GPUs and can utilize multiple GPUs simultaneously. DaVinci Resolve (free) allows for
a single GPU to be used, however the paid studio version can utilize multiple GPUs.
### Start a virtual machine
* Choose an NVIDIA GPU virtual machine and Configure
* Use the **Windows 10 Pro** image=
Be sure to set a secure password for your Windows virtual machine.
Connect to your instance via Windows Remote Desktop. Use the public IP address of the virtual machine as the remote desktop computer name.
It may try and login with your local windows account if this is the case select 'more choices' -> 'Use a different account'
and type 'admin' as the username.
### Install NVIDIA Drivers
Open a web browser on the virtual machine and go to [www.nvidia.com/download](http://www.nvidia.com/download) download the drivers you require,
if you are using an A4000/A5000/A6000 GPU be sure to download the RTX drivers.
Install the drivers.
### Install davinci resolve
Go to [www.blackmagicdesign.com/support](http://www.blackmagicdesign.com/support) and download the latest version of Davinci Resolve to the GPU virtual machine and install it.
### Connect to your project server
* Open Davinci resolve on your GPU instance
* On the home screen got to the 'Network tab'
* Click 'Add Project Library'
* Be sure to select the 'Connect' tab in the pop-up
* Enter the library name, server ip address, username and password
If you want to collaborate with other users at the same time it would be better to set your project to multiple user collaboration.
* 'File' -> 'Multiple User Collaboration'